Hello, in this article we will see how to perform a migration from one virtual machine to another region, while we can assign it to another group of resources and change its name.
Prerequisites:
- A Microsoft Azure subscription.
- Powershell (version 5.1 or higher)
- PowerShell module for Azure Az (https://docs.microsoft.com/en-us/powershell/azure/install-az-ps)
Disclaimer: Given the constant updating of Cloud Computing technologies some steps may be different at the time of reading the article, I will make the effort to keep it updated, but there could be some differences between what is shown below and the Azure console at the moment of the implementation.
Taking the disk snapshot of the virtual machine as a VHD to a Storage Account
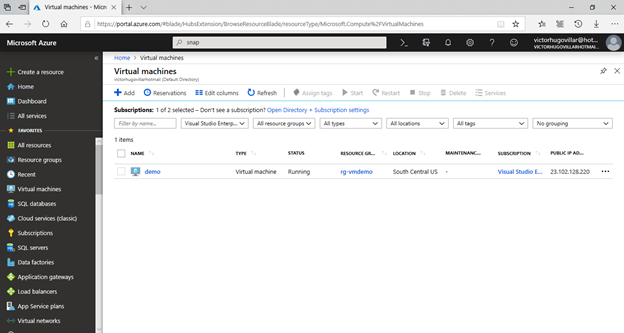
To perform the activities, we need the source virtual machine and with the following commands create resources and copy the information of the virtual machine in order to create a new one with the same information.
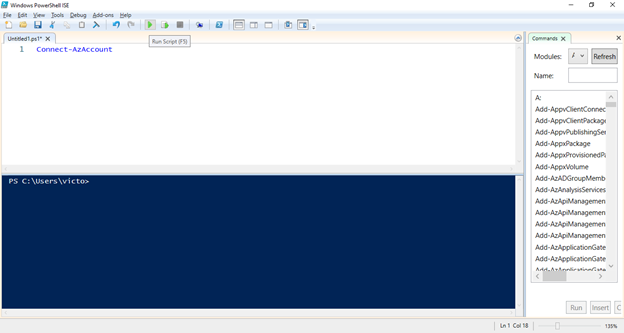
1.Enter to the PowerShell ISE program and enter to your subscription with the command:
Connect-AzAccount
Click on the run script button or press F5
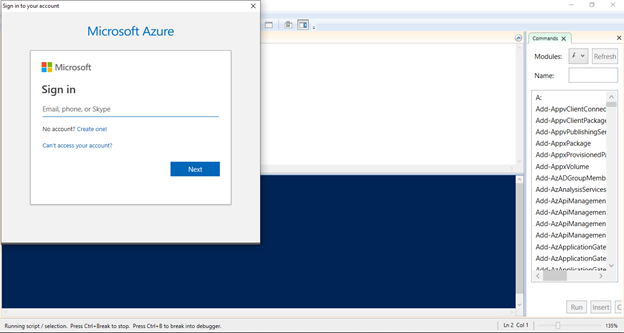
2. A pop-up window will appear. Enter the credentials of your Azure subscription
3. If you have multiple subscriptions in your account execute the command:
Select-AzSubscription -Subscription <Subscription ID>
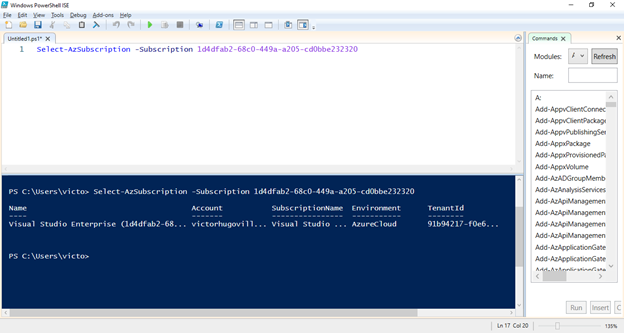
Note: To find the subscription ID to add it to the -Subscription parameter, in the Azure portal go to the Subscriptions resource and there you will see the Subscription ID.

4. Add the following commands:
#Assign the name of the destination resource group
$destResourceGroupName ="rg-vmdest"

#Provide the name of the destination region where the resource group will be created and the resources to be migrated
#(If we want to bring the list of regions you can execute the command
Get-AzLocation | select Location) $destinationRegion ="brazilsouth"

#Create the resource group
New-AzResourceGroup -Name $destresourceGroupName -Location $destinationRegion

#Assign the name of the storage account where you want to copy the snapshot (lowercase and no special characters)
$destStorageAccountName = "sadestvvillar"

#Create the storage account
$destStorageAccount = New-AzStorageAccount -name $destStorageAccountName -Location $destinationRegion -ResourceGroupName $destResourceGroupName -SkuName Standard_LRS

#Capture the context of the storage account
$destinationContext = $destStorageAccount.Context

#Assign the name of the container where the snapshot will be stored
$destStorageContainerName = "containerdestvvillar"

#Create the container within the storage account
New-AzStorageContainer -Name $destStorageContainerName -Context $destinationContext

#Assign the name of the VHD file to which the snapshot will be copied (indicate the extension .vhd at the end)
$destinationVHDFileName = "vhddest-vvillar.vhd"

# Assign the key to the storage account where you want to copy the snapshot
$storageAccountKey = (Get-AzStorageAccountKey -ResourceGroupName $destResourceGroupName -Name $destStorageAccount.StorageAccountName).Value[0]

#Assign the information of the VM from which the snapshot will be taken
$resourceGroupNameVM = 'rg-vmdemo'
$locationVM = 'South Central US'
$vmName = 'demo'

#Get the VM
$vm = get-azvm -ResourceGroupName $resourceGroupNameVM -Name $vmName

#Get the settings for the snapshot. For this example the snapshot is from the S.O. disk
$snapshot = New-AzSnapshotConfig -SourceUri $vm.StorageProfile.OsDisk.ManagedDisk.Id -Location $locationVM -CreateOption copy

#Assign the name of the snapshot
$snapshotName = "snapshotvvillar"

#Generate the snapshot
New-AzSnapshot -Snapshot $snapshot -SnapshotName $snapshotName -ResourceGroupName $destresourceGroupName

#Assign the expiration duration of the shared access signature (SAS) in seconds, for example 3600.
#Learn more about SAS here: https://docs.microsoft.com/en-us/Az.Storage/storage-dotnet-shared-access-signature-part-1
$sasExpiryDuration = "3600"

#Generate the SAS for the snapshot
$sas = Grant-AzSnapshotAccess -ResourceGroupName $destresourceGroupName -SnapshotName $snapshotName -DurationInSecond $sasExpiryDuration -Access Read

#Create the context for the storage account that will be used to copy the snapshot
$destinationContext = New-AzStorageContext -StorageAccountName $deststorageAccountName -StorageAccountKey $storageAccountKey

#Copy the snapshot to the storage account as vhd
Start-AzStorageBlobCopy -AbsoluteUri $sas.AccessSAS -DestContainer $destStorageContainerName -DestContext $destinationContext -DestBlob $destinationVHDFileName

#Depending on the size of the file the copy process may take a few minutes, to see the progress status
Get-AzStorageBlobCopyState -Blob $destinationVHDFileName -Container $destStorageContainerName -Context $destinationContext
Create a managed disk using the VHD file
Once we have the vhd, we will create the operating system’s managed disk
#Assign the name of the managed disk
$diskName = 'diskvvillar'

#Provide the size of the disk in GB. It must be greater than the size of the VHD file
$diskSize = '128'

#Provide the storage type for the managed disk. Premium_LRS, StandardSSD_LRS or Standard_LRS
$storageType = 'Premium_LRS'

#Provide the URI of the VHD file (page blob) in a storage account. Note that this is NOT the SAS URI of the storage container where the VHD file is stored.
#For example https://sadestvvillar.blob.core.windows.net/containerdestvvillar/vhddest-vvillar.vhd
#Note: The VHD file can be deleted as soon as the managed disk is created.
$sourceVHDURI = 'https://sadestvvillar.blob.core.windows.net/containerdestvvillar/vhddest-vvillar.vhd'

#Provide the ID of the storage account where the VHD file is stored.
#For example /subscriptions/1d4dadfadffab2-6sdf8c0-adsfa449a-a205-cadfsa2320/resourceGroups/rg-vmdest/providers/Microsoft.Storage/storageAccounts/sadestvvillar
#This is an optional parameter if you are creating a managed disk in the same subscription
$storageAccountId = '/subscriptions/1d4dfab2-68c0-449a-a205-cd0bbe232320/resourceGroups/rg-vmdest/providers/Microsoft.Storage/storageAccounts/sadestvvillar'

#Create and assign the disk configuration
$diskConfig = New-AzDiskConfig -AccountType $storageType -Location
$destinationRegion -CreateOption Import -StorageAccountId $storageAccountId -SourceUri $sourceVHDURI

#Create the managed disk
New-AzDisk -Disk $diskConfig -ResourceGroupName $destResourceGroupName -DiskName $diskName
Create the virtual machine using the managed disk
#Get the configuration of the virtual network where the virtual machine will be created
$vnetName = 'vnet-vvillar2'
#Resource Group where the vnet is located
$vnetResourceGroup = 'rg-networkresources'

Get-AzVirtualNetwork -Name $vnetName -ResourceGroupName $vnetResourceGroup

#Create a static public IP
$destinationResourceGroup = 'rg-senainfo-prod-002'
$ipName = "pip-vm-vvillar2"
$pip = New-AzPublicIpAddress -Name $ipName -ResourceGroupName $destinationResourceGroup -Location $destinationRegion -AllocationMethod Static

#Create the network interface card
$nicName = "nic-vm-vvillar2"
$SubnetID="/subscriptions/3bb00c13-3e17-4197-b202/807f9ad5128a/resourceGroups/rg_red/providers/Microsoft.Network/virtualNetworks/vnet_vvillar/subnets/Subnet_Prod_Web"
$nic = New-AzNetworkInterface -Name $nicName -ResourceGroupName $destinationResourceGroup -Location $destinationRegion -SubnetId $SubnetID -PublicIpAddressId $pip.Id

#Get the list of VM sizes
Get-AzVMSize -Location $destinationRegion

#Set the name and size of the VM
$vmName2 = "vm-vvillar2"
$vmConfig = New-AzVMConfig -VMName $vmName2 -VMSize "Standard_B4ms"

#Add the network interface card
$vm = Add-AzVMNetworkInterface -VM $vmConfig -Id $nic.Id

#Get the operating system disk
$osDisk = Get-AzDisk -DiskName $diskName -ResourceGroupName $destResourceGroupName

#Add operating system disk
#Note: Indicate in the last parameter if the operating system is Windows or Linux
$vm = Set-AzVMOSDisk -VM $vm -ManagedDiskId $osDisk.Id -StorageAccountType Premium_LRS -DiskSizeInGB 128 -CreateOption Attach -Windows

#Complete the VM creation
New-AzVM -ResourceGroupName $destResourceGroupName -Location $destinationRegion -VM $vm

#Verify that the VM was created
Get-AzVM -ResourceGroupName $destResourceGroupName -Name $vm.Name
I love this script
Thank you!