Hello, in this post we will see how to perform the creation of a B2C directory, the settings to add an application, the creation of an Open ID authentication to delegate authentication to users using Microsoft services and via email.
Prerequisites:
- A subscription of Microsoft Azure.
- Global administrator role in the Azure AD directory
Disclaimer: Due to the constant updating of Cloud Computing technologies some steps may be different when reading the article, I will make the effort to keep it updated, but there could be some differences between what is shown below and the Azure console at moment of implementation.
Before going to the practical part I recommend this video by John Savill in which he shows the difference and benefits of Azure AD (aka B2B) and Azure AD B2C:
Registering an application in Azure AD
- Login to https://portal.azure.com and go to the Azure Active Directory resource in All Services.
- Go to App Registrations and then click on +New Registration
- Give a name to the application and in the radio buttons select the option according to what kind of users are going to be allowed to login into the application.
- At the bottom part leave the value as web and we put together the URL to prepare the connection to the Azure AD B2C directory which has this syntax https://your-B2C-tenant-name.b2clogin.com/your-B2C-tenant-name.onmicrosoft.com/oauth2/authresp where your-B2C-tenant-name will be the name we will give to the Azure AD B2C directory, which can be like this: https://vvillar.b2clogin.com/vvillar.onmicrosoft.com/oauth2/authresp and then click on Register.
- Save the values of Application (client) ID which will be used later
- Then we will create a secret that will be used by the Azure AD B2C, to do this go to Certificates & Secrets > New client secret, a window will appear to add a name to the secret, select the expiration date and click on Add
- Copy the Client Secret (if you leave the window the client secret will not be displayed again)


Creation of Azure Active Directory B2C
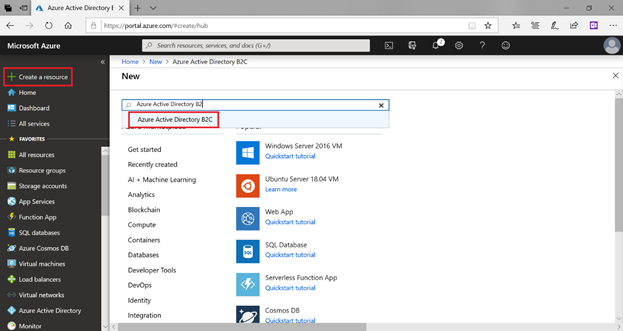
- As a next step create the B2C directory, Go to + Create a Resource and look for Azure Active Directory B2C
- A new window will appear, click on Create
- In the next window we will have two options that are really two steps, the first is to create the Azure AD B2C (tenant) directory, click on Create a new Azure AD B2C Tenant
- Give a name to the directory and a domain name, in the country we can leave it in United States or select our country if it is in the list. Click on Create
- As a next step, link the Azure AD B2C directory created with the subscription. Close the window and click on Link an existing Azure AD B2C Tenant to my Azure subscription, a window will appear, choose the directory, the subscription, and the resource group (you can use an existing one or create a new one).
- To go to the B2C directory, click on Azure AD B2C Settings and it will take you to the B2C directory


Add an application of Azure AD B2C type
Now we are going to add an Azure AD B2C type application that allows us to manage different identity providers and request and provide the application with user information.
- Within the Azure AD B2C directory go to Applications and click on Add
- Give a name to the application, in WebApp / Wen API click Yes, in Reply URL enter https://jwt.ms (it is an application that will allow us to see the attributes of a user), click Create.


Add an Open ID identity provider
- Within the Azure AD B2C select Identity providers and then New OpenID Connect provider, a window will open, indicating the following values:
- Name: VVillar Azure AD
- Metadata url: https://login.microsoftonline.com/<The Azure AD domain (not the B2C domain)>/.well-known/openid-configuration
- Client ID: The client ID that we copied in a previous step
- Client secret: The client secret that we copied in the previous step
- User ID: oid
- Display name:
name - Given name: given_name
- Surname: family_name
- Email: unique_name Click on the save button


- To test the provider we will create a flow to simulate user authentication to go to User flows (policies) and click on New user flow
- In the next window click on Sign up and sign in, enter a name, select email and Open ID; Then select the information that we will collect and which we will provide to the application and then click on Create.


Executing the flow for authentication
Now we are going to test the authentication of the application we created and the Open ID identity provider that connects to the Azure AD and the email.
- In User Flows click on the created flow called B2C_1_login.
- At the top click on Run user flow, a side sale will appear and verify the values in the image and click on the Run user flow button
- A new window will appear with the two types of authentication, mail and Azure AD (with Open ID), click on VVillar Azure AD to test the first type of authentication.
- The application will ask you to give permissions to the application to read profile information and basic organization information.
- We will enter the https://jwt.ms page with the attributes of your user
- When we click on the email option a user will appear along with a password and name.


Hi Victor,
thanks for the tutorial. Is this delegation still possible with the recent changes?
https://docs.microsoft.com/en-us/azure/active-directory-b2c/b2clogin
Metadata url: https://login.microsoftonline.com//.well-known/openid-configuration
will not be woking anymore?
Thanks, Patrick